Two-factor authentication requires two ways of proving your identity and can also be used to protect your various accounts and as such adds an additional layer of security.
It is composed of two things:
- Something you know (eg. PIN/password)
- Something you have (keycard, mobile phone (SMS, 2FA app, …)
The idea is that the user provides both credentials during the authentication and failing to do so results in an unsuccessful attempt. Basically now the attacker needs more than one credential in order to gain access to the system and hence this makes his job much harder.
To enable 2FA authentication of Flowmon users we need two things:
- TACACS+ server
- 2FA server
We will use for the demonstration purpose a free Linux TACACS+ server and Google authenticator, but you can use any alternative that works together. The authentication itself looks like ordinary TACACS+ authentication from the Flowmon system side.
Step 1: Installation of TACACS+ Server on Ubuntu Server
Download, install and update Ubuntu server edition.
Download and install TACACS+. To download TACACS+, issue the command below:
sudo apt-get install tacacs+Once installed you have to edit TACACS+ configuration file. Issue the command below:
$ sudo vi /etc/tacacs+/tac_plus.confFeel free to use any text editor you like (eg. nano).
First, you have to define an encryption key for communication between the Flowmon system and TACACS+ server. You should remember this key as it will be used later in TACACS+ configuration in Flowmon Configuration Center.
key=flowmon123
One thing left to do is define the user. Configure example user below:
user=fm2fa {
        member=admingroup
}
group=admingroup {
default service=permit
pap = file /etc/passwd
}
Save config file and restart TACACS+ server with command:
$ sudo /etc/init.d/tacacs_plus restartNow we have to create a user account on the server and set him a password:
test@ubuntu2fa:~$ sudo adduser fm2fa
Adding user `fm2fa' ...
Adding new group `fm2fa' (1001) ...
Adding new user `fm2fa' (1001) with group `fm2fa' ...
The home directory `/home/fm2fa' already exists. Not copying from `/etc/skel'.
Enter new UNIX password:
Retype new UNIX password:
passwd: password updated successfully
Changing the user information for fm2fa
Enter the new value, or press ENTER for the default
Full Name []:
Room Number []:
Work Phone []:
Home Phone []:
Other []:
Is the information correct? [Y/n] y
test@ubuntu2fa:~$
We should be ready to test TACACS+ service operation now.
Step 2: Flowmon TACACS Configuration
Open Flowmon Configuration Center. Go to System->TACACS+ and configure parameters.
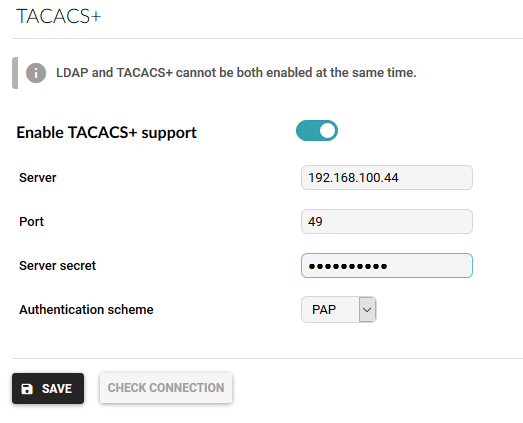
Enable TACACS+, enter the server IP address and secret key (flowmon123 in our case). For the authentication scheme select PAP. Save the configuration.Note:
When TACACS+ authentication is enabled, every user will have to use their credentials from TACACS+ directory to login to the system. In contrast to LDAP, it is not possible to assign a role to a Flowmon user in TACACS+ directory. For this reason, every Flowmon user must be configured in the Configuration Center as well, where he/she will be assigned with roles. Only users configured in both TACACS+ and Configuration Center will be allowed to log into the system.
User admin is managed in a special way. For this account, data is always taken from the local database and the TACACS+ account is never used.
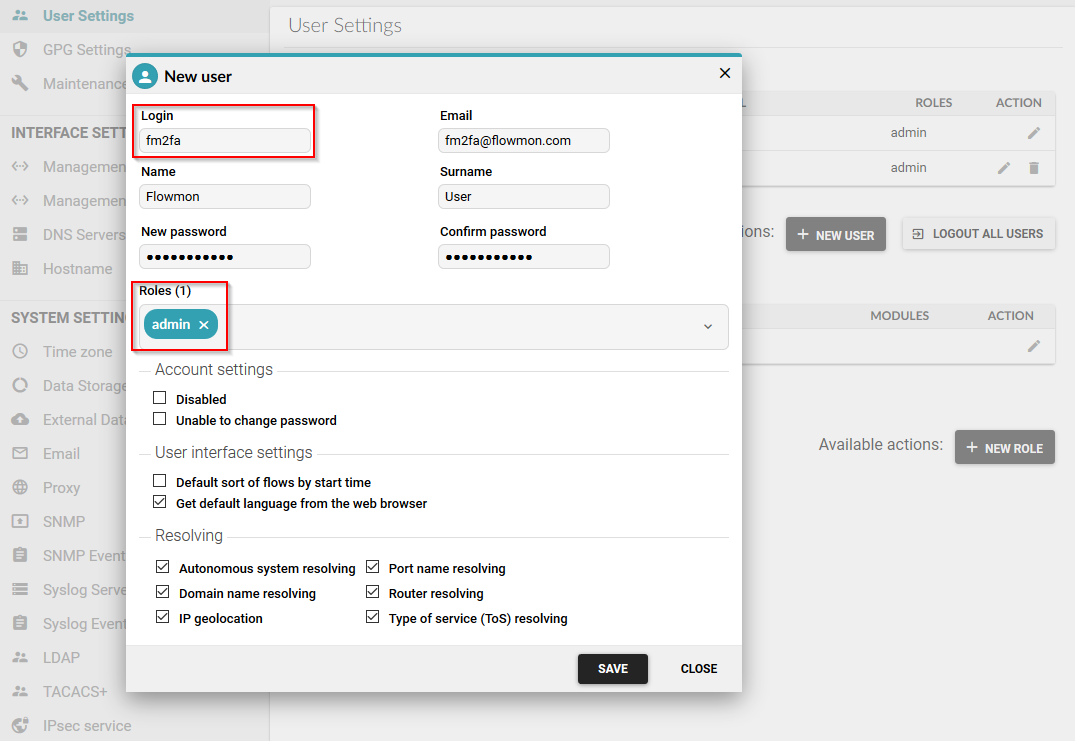
Create a new Flowmon user (in our example fm2fa). Go to User Settings and add a new user. You have to set him the password (it will be overridden by TACACS+) and assign him to the admin role.
Save the configuration and go back to TACACS+ settings in order to test TACACS+ operation.
Click the CHECK CONNECTION button and enter credentials for user fm2fa .
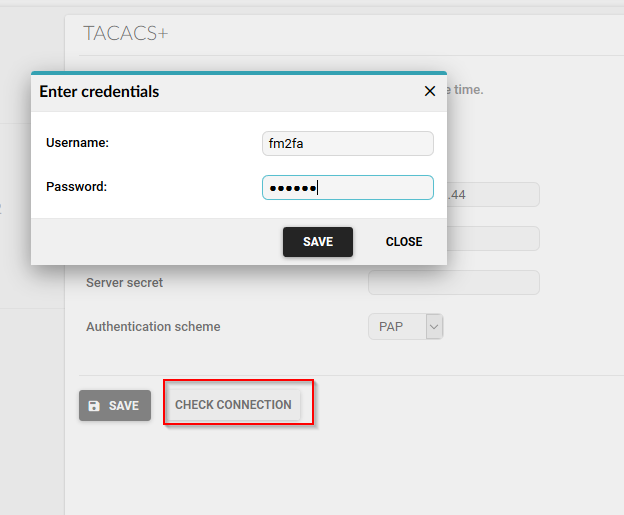
After clicking SAVE you should get successful authentication. If all went fine, then we can proceed with two-factor-authentication.
Step 3: Installation of Google Authenticator on Ubintu Server and Integration with TACACS+
Now it is time to install Google authenticator on TACACS+ server.
Issue the command below:
$ sudo apt-get install libpam-google-authenticator -yWe will change the TACACS+ config file to use Google authenticator for authentication.
Let's open
/etc/tacacs+/tac_plus.conf again.
Change group configuration in such a way that it reflects the usage of Google authentication instead of default user database.Entry
pap=file /etc/passwd should be replaced with
pap=PAM .
You config file should look similar to this:
 user=fm2fa {
        member=admingroup
}
group=admingroup {
default service=permit
pap=PAM
Restart TACACS+ server again:
$ sudo /etc/init.d/tacacs_plus restartSince we instructed TACACS+ server to use PAM, we now need to create a file called /etc/pam.d/tac_plus, so that PAM knows what to do. Use again VI editor or any alternative to create it.
The file should look like:
$ more /etc/pam.d/tac_plusauth requisite pam_google_authenticator.so forward_passauth required pam_unix.so use_first_passWe are almost at the end. The last thing we have to do is to generate a secret key for the two-factor-authentication. In our example, we have created a user fm2fa .
Change to this user with the command:
su - fm2faEnter the password you have set upon user creation.
Now issue:
google-authenticator as shown on the picture below. Answer to prompt as shown (y,y,y,n,y)
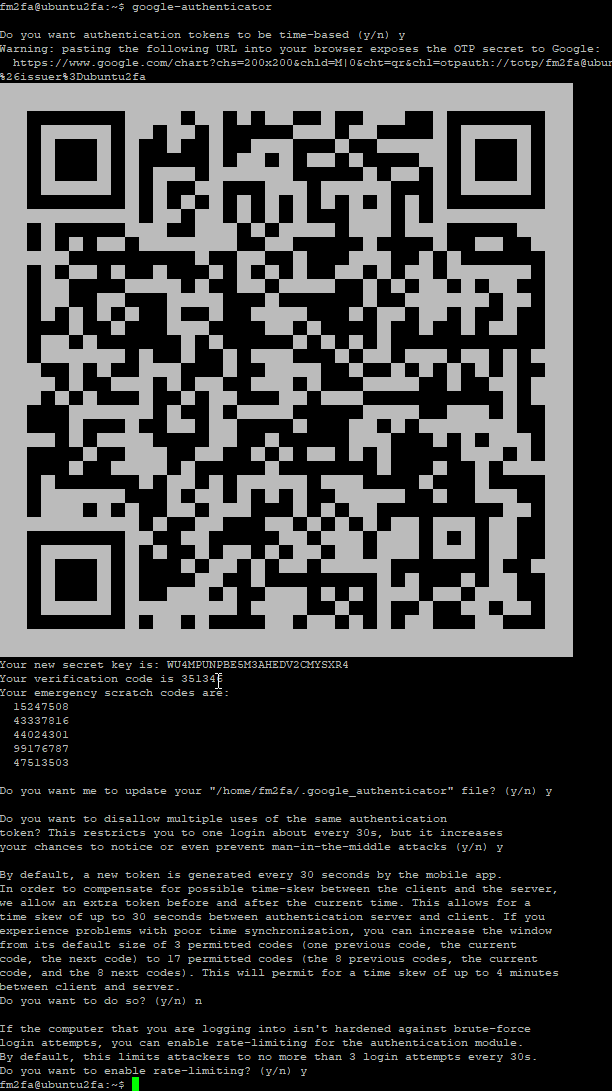
On your mobile phone download Google Authenticator app and install it. Open it and click on the red plus button to add the secret key. You can issue google-authenticator again, If your secret key QR code is not visible any more.
You have an option to scan it or to enter it manually.
Now we are all set.
Step 4: Final Test
Log to Flowmon system as normally with user fm2fa. For password use combination of Linux password (set before) + Google Auth PIN.
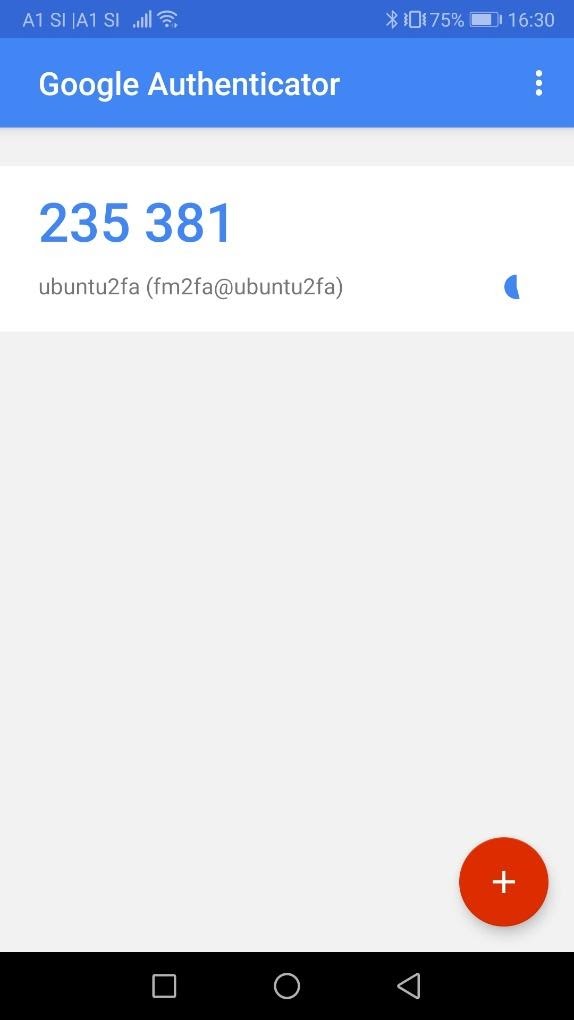
In our example password+235381.
Congratulations you have a working two-factor-authentication with Flowmon!